Creating a timeline with Angular — Step by step guide on integrating vis-timeline
What is vis-timeline?
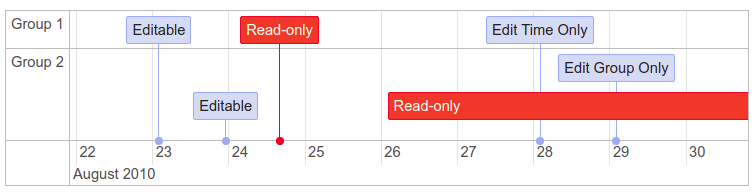
Vis-timeline is an interactive visualization chart to visualize data in time. Vis-timeline uses start and end date to represent the items on the chart. Items can be created, edited, and deleted in the timeline. However, items cannot be dateless.
How to integrate vis-timeline with angular?
Step 1: Install the package to your angular application
$ npm install vis-timeline --save
$ npm install vis-data vis-network vis-util --save
now your application’s package.json will have all these under “dependencies” :
“vis-data”: “ 7.0.0”,
“vis-network”: “ 8.0.1”,
“vis-timeline”: “ 7.4.6”,
“vis-util”: “ 4.3.4”,
Step 2: Open your application’s index.html file and add the following to the head tag:
<script type=”text/javascript” src=”//unpkg.com/vis-timeline@latest/standalone/umd/vis-timeline-graph2d.min.js”></script>
<link href=”//unpkg.com/vis-timeline@latest/styles/vis-timeline-graph2d.min.css” rel=”stylesheet” type=”text/css” />
Step 3: Copy and paste the below div to the pace where you want your timeline to be displayed:
<div #timeline id=”timeline” ></div>

Import the below packages to the typeScript file
import { Component, OnInit, ViewChild } from ‘@angular/core’;
import { ElementRef } from ‘@angular/core’;
import { Timeline } from ‘vis-timeline’;
import { DataSet } from ‘vis-data’;

Use ElementRef to refer to the timeline present in our html file using @ViewChild()
Add the following code in constructor and ngOnInit()
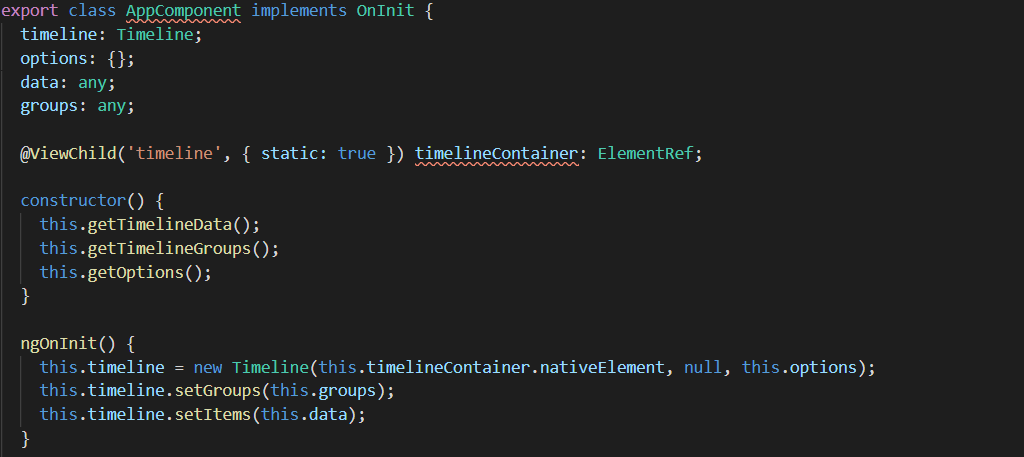
this.getTimelineData() is a method that we will use to create our timeline items.
this.getTimelineGroups() is a method that we will use to group our timeline items.
this.getOptions() is a method that we will use to configure our timeline.
Step 6: Let’s create the three methods mentioned above.


You can always edit the time-line axis to hold any type of values, be it 00:00 or January 20, or anyway you want it. The vis-timeline is pretty much adaptable to our customization.
Step 7 : THE LAST STEP! Now run the application using ng serve .
Tadaaa! We will have our application like this:

TO LEARN MORE ON THE CONFIGURATIONS OF THE TIMELINE , REFER https://visjs.github.io/vis-timeline/docs/timeline/
ALSO, TO KNOW HOW TO CREATE A VIDEO EDITOR TIMELINE USING VIS-TIMELINE, REFER MY NEXT POST : click here